
We may earn money or products from the companies mentioned in this post.
(Last Updated On: August 31, 2023)Making your own sourdough starter is not only a rewarding process but also a fun step in baking delicious, tangy sourdough bread. A sourdough starter is a live culture of flour and water that ferments over time, providing the leavening power for your sourdough bakes.
Creating a starter from scratch might seem intimidating, but with a few simple steps and regular maintenance, you will have a thriving, healthy starter in no time!

We’ll share the basics of sourdough starters, including the ingredients and utensils needed, and how to create a starter from scratch. You’ll also learn how to regularly feed and store your starter to keep it active and strong.
Outline
- Understanding Sourdough Starter
- Ingredients & Tools
- Creating Sourdough From Scratch
- Buying Sourdough Starter
- Storing and Feeding Your Starter
- Baking With Sourdough Starter
- Tips & Techniques
- FAQ’s
Understanding Sourdough Starter
Bubbly Activity
When creating a sourdough starter, you’ll notice bubbly activity, which indicates the presence of yeast and bacteria. These bubbles are the result of the fermentation process, as microorganisms consume sugars and produce carbon dioxide. The trapped gas causes the starter to rise, effectively leavening your dough.
Role of Yeast and Bacteria
Yeast and bacteria have a significant role in a sourdough starter. Naturally occurring yeast and good bacteria, such as Lactobacillus, are responsible for fermenting and leavening the dough. These beneficial organisms work together, creating the complex flavor and texture characteristic of sourdough.
Fermentation vs Leavening
It’s essential to differentiate between fermentation and leavening in sourdough making:
- Fermentation: The process where yeast and bacteria break down the sugars in the flour, producing lactic acid, acetic acid, and ethanol. Fermentation imparts the distinct sourdough flavor and plays a role in dough rising.
- Leavening: The action that results from the trapping of carbon dioxide produced by the fermentation process. The gas lifts the dough, creating a lighter, airier texture.
Health Benefits
There are several health benefits associated with sourdough starters:
- Better digestion: The fermentation process may help break down gluten, potentially making it easier to digest for some individuals.
- Increased nutrient availability: Fermentation can help break down phytic acid, which binds to minerals in grains, improving mineral absorption.
- Lower glycemic index: Sourdough bread is thought to have a lower glycemic index, which may help manage blood sugar levels.
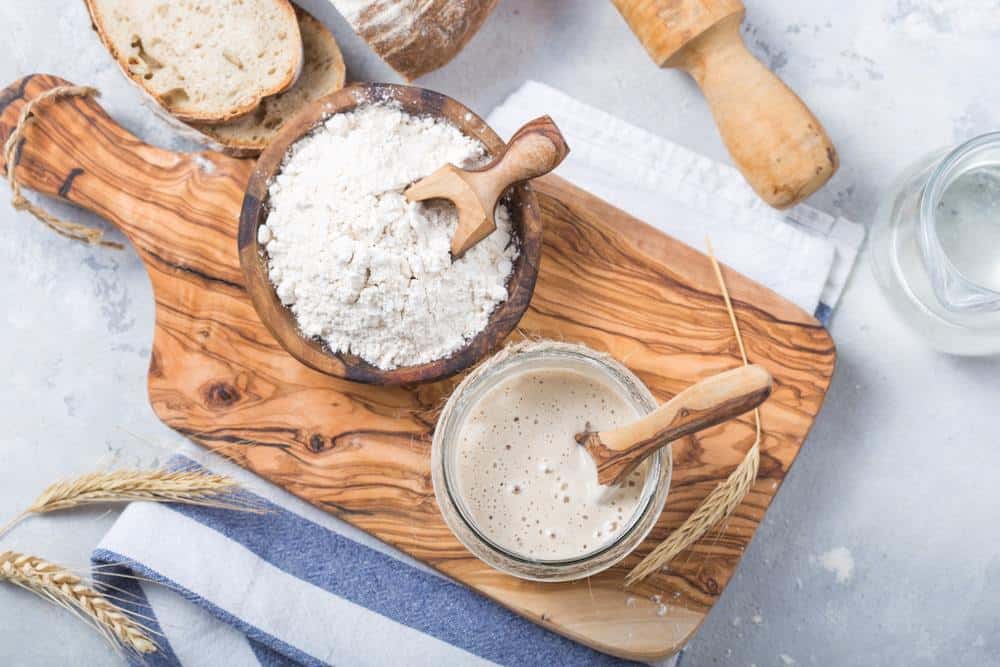
Ingredients and Utensils
Choosing the Right Flour
To make a sourdough starter, the most important ingredient is the flour. Whole-grain flours such as whole wheat and rye are optimal choices due to their higher microorganism and protein content. These qualities provide better nourishment for the yeast. You can also use unbleached all-purpose flour or a blend of white, whole wheat, and bread flours to create your sourdough starter.
Our Favorite Flours:
- Sunrise Flour Mill: Heritage Bread Blend (a pre-1950’s organic wheat, milled with old-school techniques. Many people find them more digestible – but see for yourself! It’s my favorite bread flour – can you tell? 😉
- King Arthur, 100% Organic White Whole Wheat Flour: Delicious & perfect for your whole-wheat sourdough bakes!
Water: Tap or Filtered
The second ingredient you need is water. Both tap water and filtered water can be used for your sourdough starter. If you know that your local tap water contains chlorine, it’s wise to use filtered water or let the tap water sit for a few hours to allow the chlorine to evaporate. The water temperature should be lukewarm for the best results.
Types of Containers
When choosing a container for your sourdough starter, you have a few options. Containers made of glass, food-grade plastic, or stainless steel work well. Avoid using reactive metal containers. A one-quart or larger capacity container is recommended to ensure there’s enough room for the starter to grow. A kitchen scale is also helpful to accurately measure the flour and water.
Our Favorite Sourdough Ingredients & Tools
Bread Flour:
Sunrise Flour Mill: Heritage Bread Blend and King Arthur 100% White Whole Wheat Flour
Kitchen Scale
Etekcity Food Kitchen Scale
Bread Proofing Basket
Superbaking Banneton Bread Proofing Basket
Dutch Oven
Artisan 5 Quart Enameled Dutch Oven
Creating Sourdough Starter From Scratch
Ingredients:
- 30g whole wheat flour
- 30g rye flour
- 60g water
*My favorite bread flour comes from a local mill, Sunrise Flour Mill, and uses pre-1950’s organic heritage wheat. Use this link for 10% off!
Instructions:
Day 1:
- In a clean, non-reactive container, mix together 50g whole wheat flour, 50g rye flour, and 100g water until well combined.
- Cover the container with a clean cloth or plastic wrap and let it sit at room temperature for 24 hours.
Day 2:
- Discard half of the starter and add 50g whole wheat flour, 50g rye flour, and 100g water to the remaining starter. Mix well. You may not see any activity from your starter today.
- Cover the container and let it sit at room temperature for 24 hours.
Day 3:
- Today you should start seeing some activity – some bubbling or a light, fruity aroma. Discard half of the starter and add 50g whole wheat flour, 50g rye flour, and 100g water to the remaining starter. Mix well.
- Cover the container and let it sit at room temperature for another 24 hours. If your room is cool, you can set your starter in the oven with just the light on, for a couple hours. The light alone will produce quite a bit of heat, so check it regularly and take out if too warm.
Day 4:
- Discard half of the starter (into another “discard” container that can be used to bake other yummy recipes!) and add 50g whole wheat flour, 50g rye flour, and 100g water to the remaining starter. Mix well.
- Again, cover the container and let it sit at room temperature for 24 hours.
Day 5:
- Repeat the previous days – discarding and feeding. Let sit for 24 hours. By the evening of day 5, you should see your starter double in size! If it hasn’t doubled yet, no worries. Continue feeding on day 6 as normal.
Day 6:
- If your starter hasn’t doubled yet, continue discarding and feeding as normal.
- If your starter has doubled, yay! You will give it one more day of feeding (don’t forget to discard first), and then it should be ready to use.
Day 7:
- Your starter should now be bubbly and active. You can now use it to make sourdough bread or store it in the refrigerator until ready to use.
- To maintain your starter, you can feed it with fresh flour and water every 24 hours or store it in the refrigerator and feed it once a week.
Note: It’s important to maintain a 1:1:2 ratio of flour to water in your starter for best results. You can easily adjust the amounts of flour and water used to make more or less starter, as long as you maintain this ratio.
Feeding and Temperature Control
Typically, feeding works by combining equal parts of whole grain flour (such as rye or whole wheat) and water in a non-reactive container. Make sure the container is large enough to hold the expanding starter, ideally with at least 1-quart capacity. The water should be warm, around 65 to 80 degrees F, to promote yeast activity.
Also, keep your starter in a warm place, ideally around 70 to 75 degrees F, as temperature plays a crucial role in controlling the activity of the wild yeast.
Maintaining Starter Activity
Watch your starter for signs of activity, like bubbles forming on the surface and a rise in volume. This indicates that the wild yeast is fermenting the flour and producing gas. It may take a few days for the starter to become reliably bubbly and active.
Establish a regular feeding schedule for your sourdough starter, typically once or twice per day. When your starter is consistently doubling in volume within 4 to 6 hours of feeding, it’s ready for bread baking. Remember the following key points for maintaining starter activity:
- Use whole grain flours, as they have more nutrients for the yeast to thrive.
- Feed your starter with equal parts flour and water.
- Store the starter in a warm environment to support yeast activity.
Dealing with Potential Problems
Sourdough starters can sometimes face issues like excess acidity, slow activity, or a change in consistency. To manage these problems:
- If your starter smells too acidic or develops a layer of liquid on the surface, increase the feeding frequency. This helps dilute the acidity and support the yeast’s growth.
- If your starter is sluggish or slow to rise, move it to a warmer environment. A consistent temperature of 70 to 75 degrees F is essential for yeast activity.
- If the starter becomes too thick or thin, adjust the ratio of flour and water during feeding. This will help achieve the desired consistency.
When you’re not using your sourdough starter for baking, store it in the refrigerator. This slows down the yeast activity, so you only need to feed it once a week. Discarded starter can be used in other recipes or added to your compost.
One of the BEST THINGS I have done is joined an online Facebook group called Sourdough Starters. It’s a support group where I find helpful images and solutions to any of my starter problems. (Pro-tip: don’t worry about all the “perfect loaves”, “beautiful crumb” comments – if you and your family love your bread, it’s PERFECT!)
Buying Sourdough Starter
Does the recipe for making your own starter look like a little too much work? Purchasing a sourdough starter can save you from the trial-and-error, especially if you’re new to sourdough baking. As a busy full-time teacher and mom, I have done both. But I admit, I like using starter that is ready for me (and because they often have a deep history!).
Store-bought sourdough starters are available both online and in specialty baking stores. There are many variety of starters originating from different regions, each with their distinct flavors. Our favorites are:
When selecting a starter, consider factors such as the type of flour used, the taste profile, and the starter’s origin to match your preferences. My favorite flours are King Arthur’s 100% Organic White Whole Wheat and Sunrise Flour Mill. Keep in mind that each starter may require specific feeding and maintenance routines based on their composition.
Once you receive your purchased sourdough starter, be sure to follow the provided instructions for activating and feeding it. Typically, you will need to mix it with water and flour to create an active, bubbly mixture. This process generally takes a few days and requires regular feeding intervals to ensure a healthy and active starter.
Remember to store your sourdough starter in a clean, non-reactive container such as glass or food-grade plastic. A container with at least a 1-quart capacity will allow your starter to grow without spilling over. An airtight lid is also essential to maintain the starter’s freshness.
Storing and Regular Feeding of the Starter
Understanding the Feeding Schedule
To keep your sourdough starter healthy and active, it’s crucial to establish a regular feeding schedule. Feeding involves adding equal parts flour and water by weight (commonly referred to as a 1:1:1 ratio) to your starter. This fresh food helps the yeast and bacteria thrive.
Typically, you should feed your starter once every 24 hours if stored at room temperature, but if kept in the refrigerator, you can feed it once a week.
Refrigeration and Regular Use
If you don’t plan to use your starter frequently, it’s best to store it in the refrigerator to slow down the activity of the yeast and bacteria. Before refrigerating, make sure your starter has been fed and is not showing significant signs of bubbling or rising.
When you want to use it, allow it to reach room temperature, then give it at least one feeding before incorporating it into your recipe. After using your refrigerated starter, remember to feed it and let it rest at room temperature for a couple of hours before returning it to the fridge.
Replenishing Your Starter
Each time you use or discard some of your starter, it’s crucial to replenish what was taken by feeding it with flour and water. This ensures its continued growth and activity. To maintain the correct consistency, avoid adding too much sugar, which can change the balance and impact the health of the yeast and bacteria.
Additionally, over time, the acidity in the starter may build up, causing it to weaken. This can be corrected by occasionally discarding a portion of the starter and feeding it with additional flour and water.
Mold Issues
Mold can occasionally develop in sourdough starters, primarily when the temperature and humidity of its environment fluctuate. Regular maintenance and feeding usually prevent mold growth, but if you do encounter mold, you may still be able to salvage your starter.
If you spot small amounts of mold on the surface, remove the affected area and some of the unaffected starter, then transfer the remaining portion to a clean container. Feed the starter with flour and water, then keep an eye on it for a few days to ensure the mold doesn’t return. If mold has penetrated deeper into the starter or the odor is off, it’s best to discard it and start fresh.

Baking with your sourdough starter
Baking Sourdough Bread
Sourdough bread recipes use the natural yeast present in the sourdough starter, rather than store-bought yeast, to leaven the dough. This process can take longer than using commercial yeast, but the result is a flavorful, naturally leavened bread. Try this easy sourdough recipe:
Ingredients:
- 125g active sourdough starter
- 400g bread flour
- 9g salt
- 250g warm water
Instructions:
- In a large mixing bowl, combine the sourdough starter and warm water.
- Add the bread flour and salt to the bowl and mix until a shaggy dough forms.
- Place the dough in a lightly greased bowl and cover with a cloth. Let sit for 45 min.
- Stretch and fold the dough, once each hour, over the next 4 hours.
- Cover with a cloth. Let it rise for 4-6 hours, or until it has doubled in size.
- Preheat your oven to 450°F (230°C) and place a Dutch oven inside to heat up.
- Once the dough has risen, carefully remove the Dutch oven from the oven and place the dough inside. Sprinkle with a few drops of water.
- Cover the Dutch oven with an oven-safe lid and bake for 20 minutes.
- Remove the lid and bake for an additional 10-15 minutes, or until the bread is golden brown and sounds hollow when tapped.
- Remove the bread from the Dutch oven and let it cool on a wire rack for at least one hour before slicing and serving.
Looking for more sourdough bread recipes? Here are some of our favorites:
The Clever Carrot: Sourdough bread, a beginner’s guide
Easy Sourdough Bread
And our favorite cookbook for Artisan bread:
Artisan Sourdough Made Simple: A Beginner’s Guide to Delicious Handcrafted Bread
Alternate Uses for Discard
Don’t let your sourdough discard go to waste! There are many creative uses for sourdough discard in various recipes. Some alternate uses for your discard include:
- Pancakes and waffles: Mix your discard with flour, milk, sugar, and a little baking powder to create a delicious sourdough pancake or waffle batter.
- Crackers: Combine discard with flour, butter, and seasoning to make a cracker dough, then roll it out thin and bake until crispy.
- Flatbreads and pizza crusts: Use discard in place of some flour and water in a flatbread or pizza crust recipe for added flavor and a slightly tangy taste.
- Muffins and cakes: Reduce the amount of flour and liquid in your favorite muffin or cake recipe and substitute with an equal amount of sourdough discard to incorporate a subtle sourdough flavor.
Tips and Techniques
Extra Feedings
Extra feedings can help speed up the fermentation process and develop a stronger, more resilient sourdough starter. To do this, consider adding an extra feeding to your schedule when your starter is relatively new. This will ensure that the wild yeast and friendly bacteria have enough food to thrive and multiply. To add an extra feeding:
- Observe the usual feeding schedule (e.g., once every 12 hours) but increase feedings to 2-3 times per day.
- Maintain your starter’s hydration level by ensuring you always mix the starter evenly with water and flour.
Recognizing Ripeness
Recognizing when your sourdough starter is ripe is crucial for successful baking. A ripe starter will display the following characteristics:
- Bubbles throughout the mixture, indicating active fermentation.
- A pleasant, slightly tangy or sweet smell.
- Foaming.
- Passes the float test: A small spoonful of the starter should float when dropped into lukewarm water.
Hydration and Consistency Tests
Maintaining proper hydration and consistency ensures your sourdough starter develops the desired flavor and texture. To check the hydration and consistency, perform these tests:
- Hydration: Measure the weight of your flour and water, aiming for a 100% hydration level. This means equal parts flour and water by weight. Adjust amounts as needed to maintain this ratio.
- Consistency: Your starter should not be too thick or too thin. It should have a thick, pancake batter-like consistency when properly mixed. Any clumps of dry flour should be incorporated into the mixture. Adjust the amount of water or flour to achieve the desired consistency.
Environment and Hygiene
Creating an ideal environment for your sourdough starter goes a long way in ensuring its success. Here are some tips to set up the perfect environment:
- Use warm water: The ideal water temperature for sourdough starter is between 65-80° F (18-27° C). Warm water encourages fermentation and wild yeast multiplication.
- Keep your starter container clean: Regularly wash and sterilize your starter container to avoid contamination and undesired microorganisms.
- Minimize air exposure: Always cover your sourdough starter with a clean, breathable cloth or lid to keep it from drying out.
- Maintain a consistent temperature: A stable, warm environment helps your starter ferment and ripen. Aim for a temperature of around 75° F (24° C).
Frequently Asked Questions
What are the key ingredients for a sourdough starter?
To create a sourdough starter, you only need two key ingredients: flour and water. Mixing these two ingredients creates a medium that allows wild yeast and lactic acid bacteria to develop. These microorganisms provide the necessary leavening and flavor for sourdough bread.
Which type of flour is recommended for a sourdough starter?
While you can use a variety of flours for your sourdough starter, whole grain flours like one of our favorites, King Arthur’s 100% Organic White Whole Wheat are recommended for their high nutrient content. You can experiment with whole wheat, rye, or spelt flours. Beyond that, all-purpose flour can also work well in creating a healthy sourdough starter.
I know I’m on “repeat” here, but my hands-down favorite flour comes from our local mill Sunrise Flour Mill. Their flour blends are traditional, pre-1950’s organic wheat. They use a process from the 1930’s to keep as many nutrients in tact as possible. Check them out, they’re amazing!
How do you maintain and feed a sourdough starter?
To maintain your sourdough starter, you need to feed it consistently with equal parts flour and water by weight. Feeding is typically done once or twice a day, depending on your starter’s activity level. Make sure to discard a portion of the starter before feeding to prevent it from becoming overly-large and to keep it at a manageable size.
What is the timeframe for creating an active sourdough starter?
Expect the process of creating an active sourdough starter to take anywhere between 5 to 7 days. However, this timeframe can vary depending on the flour used, the temperature, and other environmental factors. Be patient and consistently feed your starter, observing its activity as it develops.
How do you know when your sourdough starter is ready to use?
Your sourdough starter is ready to use when it reliably doubles or triples in size within 4 to 6 hours after feeding. It should have a pleasant, slightly sour aroma and a bubbly surface, indicating that the wild yeast and lactic acid bacteria are active and producing gas.
How do you increase bacteria in sourdough starter?
One way is to feed your starter more frequently, which will encourage the growth of both bacteria and yeast. You can also try adding more whole grain flour to your starter, as this can provide a better environment for bacteria to thrive.
Another option is to increase the temperature of your starter, as bacteria tend to grow more quickly in warmer environments. Finally, you can try using different types of flour or water to feed your starter, as this can introduce new bacteria to the mix.
Any tips for troubleshooting a struggling sourdough starter?
If you encounter problems with your sourdough starter, consider the following tips:
- Ensure that your starter is kept at a warm temperature, ideally around 76-82°F (24-26°C), as colder temperatures can slow down the fermentation process.
- Verify that you’re feeding your starter with fresh, high-quality flour.
- Make sure to maintain a consistent feeding schedule and discard a portion of the starter before each feeding.
- Do not use chlorinated tap water as it can inhibit the growth of microorganisms. Instead, use filtered or bottled water.
Finally, become a member of an online group, such as the facebook group Sourdough Starters. You will find invaluable information – all the good things, and all the bad things. The “pros” will are more than happy to chime in and help you out, too!
Happy Baking!